
[An earlier version of this article was available at photo.net in the USA 1996–2016.
An abridged Russian version: Камера-обскура.
The Russian version is also available as a pdf file.
The history section has been translated into Spanish,
and slightly abridged also into Portuguese:
Stenoptik – A Optica Estenopéica.
Major parts have been translated into Polish.]
Last updated 10 March 2025
 © Jon Grepstad
Contents
Introduction
Pinhole photography is lensless photography. A tiny hole replaces the lens. Light passes through the hole; an image is formed in the camera.
Pinhole cameras are small or large, improvised or designed with great care. Cameras have been made of sea shells, many have been made of oatmeal boxes, drink cans or cookie containers, at least one has been made of a discarded refrigerator. Cameras have been cast in plaster like a face mask, constructed from beautiful hardwoods, built in metal with bellows and a range of multiple pinholes. Station wagons have been used as pinhole cameras – and rooms in large buildings. Basically a pinhole camera is a box, with a tiny hole at one end and film or photographic paper at the other.
Pinhole cameras are used for fun, for art and for science.
Designing and building the cameras is great fun. Making images with cameras you have made yourself is a great pleasure, too. But in serious photography the pinhole camera is just an imaging device with its advantages and limitations, special characteristics and potentials. By making the best of the camera’s potential great images can be produced. Some of the images could not have been made with a lens.
Characteristics
Pinhole images are softer – less sharp – than pictures made with a lens. The images have nearly infinite depth of field. Wide angle images remain absolutely rectilinear.
Exposures are long, ranging from half a second to several hours. Images are exposed on film or paper – negative or positive; black and white, or color.
Pinhole optics, by the way, are not only used in photography. There is one animal in nature which uses a pinhole for seeing – the mollusk Nautilus. Each eye has an accommodating aperture – the aperture can enlarge or shrink. In this drawing, originally taken from a book published by Arthur Willey in 1900, the eye is the oval opening to the upper right.
History
Early Observations and
Experiments
The basic optical principles of the pinhole are commented on in Chinese texts from the fifth century BC. Chinese writers had discovered by experiments that light travels in straight lines. The philosopher Mo Ti (Mo Tzu, Lat. Micius) was the first – to our knowledge – to record the formation of an inverted image with a pinhole or screen. Mo Ti was aware that objects reflect light in all directions, and that rays from the top of an object, when passing through a hole, will produce the lower part of an image (Hammond 1981:1). According to Hammond, there is no further reference to the camera obscura in Chinese texts until the ninth century AD, when Tuan Chheng Shih refers to an image in a pagoda. Shen Kua later corrected his explanation of the image. Yu Chao-Lung in the tenth century used model pagodas to make pinhole images on a screen. However, no geometric theory on image formation resulted from these experiments and observations (Hammond 1981:2).
In the western hemisphere, Aristotle (fourth century BC) comments on
pinhole image formation in his work Problems. In Book XV, 6, he
asks: “Why is it that when the sun passes through quadri-laterals, as for
instance in wickerwork, it does not produce a figure rectangular in shape
but circular? […]” In Book XV, 11, he asks further: “Why is it that an
eclipse of the sun, if one looks at it through a sieve or through leaves,
such as a plane-tree or other broadleaved tree, or if one joins the
fingers of one hand over the fingers of the other, the rays are
crescent-shaped where they reach the earth? Is it for the same reason as
that when light shines through a rectangular peep-hole, it appears
circular in the form of a cone? […]” (Aristotle 1936:333,341). Aristotle
found no satisfactory explanation to his observation; the problem remained
unresolved until the 16th century (Hammond 1981:5).
A photo of the phenomenon observed by Aristotle more than two thousand years ago:
The Arabian physicist and mathematician Ibn al-Haytham, also known as
Alhazen, experimented with image formation in the tenth century AD. He arranged three candles in a row and put a screen with a small hole between the
candles and the wall. He noted that images were formed only by means of
small holes and that the candle to the right made an image to the left on
the wall. From his observations he deduced the linearity of light.
(Hammond 1981:5).
In the following centuries, the pinhole technique was used by optical
scientists in various experiments to study sunlight projected from a small
aperture.
The Renaissance and Post-Renaissance
In the Renaissance and later centuries, the pinhole was mainly used for
scientific purposes in astronomy and, fitted with a lens, as a drawing aid
for artists and amateur painters.
Leonardo da Vinci (1452–1519) describes pinhole image formation in his Codex
Atlanticus (Vinci, Leonardo, Ambrosian Library, Milan, Italy, Recto A
of Folio 337), and Manuscript D (Manuscript D, Vinci, Leonardo,
Institut de France, Paris, Folio 8). These descriptions, however, would
remain unknown until Venturi deciphered and published them in 1797. The
following translation from the Codex Atlanticus, in German, is by Eder
(1905:27):
“Wenn die Fassade eines Gebäudes, oder ein Platz, oder eine Landschaft von der Sonne beleuchtet wird and man bringt auf der gegenüberliegenden Seite in der Wand einer nicht von der Sonne getroffenen
Wohnung ein kleines Löchlein an, so werden alle erleuchteten Gegenstände ihr Bild durch diese Öffnung senden und werden umgekehrt erscheinen”.
English translation: “If the facade of a building, or a place, or a landscape is illuminated by the sun and a small hole is drilled in the wall of a room in a building facing this, which is not directly lighted by the sun, then all objects illuminated by the sun will send their images through this aperture and will appear, upside down, on the wall facing the hole”. (Eder, 1945:39).
According to Kim H. Veltman there are no less than 270 diagrams of camera obscuras in Leonardo’s notebooks.
- Leonardo da Vinci: The function of the eye as explained by the camera obscura (Richter, 1880: Notebooks 70)
- Leonardo da Vinci: The function of the eye as explained by the camera obscura (Richter, 1880: Notebooks 71)
In 1475 the Renaissance mathematician and astronomer Paolo Toscanelli placed a bronze ring with an aperture in a window in the Cathedral of Florence, still in use today. On sunny days a solar image is projected through the hole onto the cathedral’s floor. At noon, the solar image bisects a “noon-mark” on the floor. The image and noon-mark were used for telling time (Renner 1995:6).
In 1580 papal astronomers used a pinhole and a similar noon-mark in the
Vatican Observatory in Rome to prove to Pope Gregory XIII that the spring
equinox fell incorrectly on 11 March rather than on 21 March. Two years
later, after careful consideration, Pope Gregory XIII corrected the Julian
calendar by 10 days, thus creating the Gregorian calendar (Renner 1995:7).
Giovanni Battista della Porta (1538–1615), a scientist from Naples, was
long regarded as the inventor of the camera obscura because of his
description of the pinhole (lensless) camera obscura in the first edition
of his Magia naturalis (1558). His description has received much publicity, as
did his camera obscura shows, but he was by no means the inventor.
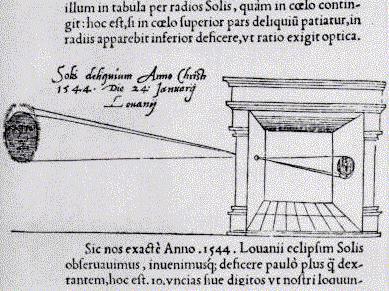
The first published picture of a pinhole camera obscura is apparently a drawing in Gemma Frisius’ De Radio Astronomica et Geometrica (1545). Gemma Frisius, an astronomer, had used the pinhole in his darkened room to study the solar eclipse of 1544. The very term camera obscura (“dark room”) was coined by Johannes Kepler (1571–1630). At his time, the term had come to mean a room, tent or box with a lens aperture used by artists to draw a landscape. The lens made the image brighter and focused at a certain distance. (Adding a bi-convex lens to the camera obscura had been suggested by Girolamo Cardano in De subtilitate libri around 1550.) Thus this type of camera differed from the pinhole camera obscura used by Frisius in 1544. In the 1620s Johannes Kepler invented a portable camera obscura. Camera obscuras as drawing aids were soon found in many shapes and sizes. They were used by both artists and amateur painters.
- Camera obscura – a basic sketch
- Photo of camera obscura, Science Museum, London
- Camera obscuras at the Museum of the History of Science, Oxford
- Open Digital Library: Camera Obscura (image collection, bibliography, electronic texts)
- Sir Joshua Reynolds’s collapsable camera obscura (Science & Society Picture Library)
- Four drawings by Canaletto of Campo San Giovanni e Paolo in Venice, made with the aid of a camera obscura
- Canaletto’s camera obscura (Open Digital Library)
- The Camera Obscura : Its Uses, Action, and Construction (H.C. Standage, Amateur Work Illustrated, ol. IV, 1885. [brightbites.com])
- Wolfgang Lefèvre (ed.): Inside the Camera Obscura – Optics and Art
under the Spell of the Projected Image [pdf]
Walk-In Camera Obscuras
During the 19th century, several large scale camera obscuras were built
as places of education and entertainment. The meniscus lens, superior to
the bi-convex lens, improved the quality of the the projected images.
Some buildings or towers with camera obscuras from this period remain today: The Camera Obscura at the Royal Mile, Edinburgh built in the 1850s; the 1836 camera obscura at Dumfries, Scotland; the Clifton Observatory at Bristol, England from 1828; the camera on the Mount Oybin in Germany, wich dates back to 1852, and others. The camera obscura at Eger, Hungary, was opened around 1780 and is one of the oldest cameras obscuras that can still be visited in Europe. It got new optics in the 1850s and the 1960s, but the original mirror is still in use.
Quite a few room-sized camera obscuras have been built in the 20th century, for instance, the Eastbourne Pier camera obscura in East Sussex, Britain, which dates back to 1901; the Kirriemuir Camera Obscura, Scotland, built in 1929; the Giant Camera at Cliff House, San Francisco, constructed in 1948-49; the camera obscura at Santa Monica, California, established in 1955, with a mechanism from around 1900; the Torre Tavira camera obscura in Cádiz, Spain, which opened in 1994; the camera obscura at Castelo de São Jorge in Lisbon, inaugurated in 1998; the camera obscura at Plaza Vieja in Havana, Cuba, finished about the same time. The camera obscura installed in 1992 in the Broich Watertower in Mühlheim an der Ruhr in Germany claims to be the largest walk-in camera obscura in the world, whereas the camera obscura in Perdika (Aegina island), Greece, installed in a cylindrical WWII gun emplacement in 2003, claimed to be the only camera obscura that produces a 360° panorama. The panorama was split up in twelve individual images, upside down and reversed, on a circular, semi-transparent screen, hanging down from the ceiling. Unfortunately, the place has been vandalised and os no longer a tourist attraction. One of the most beautiful modern architecture camera obscuras may be the camera obscura at Trondheim, Norway, which was opened in December 2006.
- Camera Obscura World, a survey of walk-in camera obscuras
- Nilu Uzadi’s walk-in camera obscuras (temporary or permanent)
The First Pinhole Photographs
Sir David Brewster, a Scottish scientist, was one of the first to make pinhole photographs, in the 1850s. He was also one of the first to use the word “pinhole” in this context, or “pin-hole” with a hyphen, which he used in his book The Stereoscope, published in 1856. However, in 2009 Sam Morton, an 18 year old Scottish student, discovered that the word “pin-hole” was used in a similar optical context as early as in 1764 by James Ferguson in his Lectures on select subjects in mechanics, hydrostatics, pneumatics, and optics. Joseph Petzval used the term “natural camera” in 1859, whereas Dehors and Deslandres, in the late 1880s, proposed the term “stenopaic camera” (“sténopé-photographe”).
A linguistic sidestep: In French today “sténopé” (from Greek στενός, stenós, ‘narrow’, and ὀπή, opḗ, ‘hole’) is used for the English “pinhole”. The word “stenop” (стеноп) is also used in Russian, as are пинхoл камера (“pinhole kamera”) and камера обскура (“kamera obskura”). Czech and Polish use “dírková komora” and “kamera otworkowa” respectively. In Italian a pinhole camera is often called “una macchina stenopeica” or “una fotocamera stenopeica”, in Spanish “una cámara estenopeica”. In German “Lochkamera” (“Loch” means ‘hole’) and “Camera obscura” are used. Dutch uses the words “gaatjescamera” (“gaatje” = ‘perforation’, ‘puncture’), “speldenprikcamera” and “pinhole camera”. The Scandinavian languages tend to use the English “pinhole” as a model – “hullkamera”/”holkamera”/”hålkamera”, though “camera obscura” is also found, and is the term preferred by myself in Norwegian. (“Camera obscura” may be somewhat misleading, however, since historically camera obscuras were equipped with a lens at an early stage of their development.) In Icelandic the word “opmyndavél” is used. Hungarian, a non-Indo-European language, calls a pinhole camera “lyukkamera”; Turkish, another non-Indo-European language, uses “İğne deliği kamera”. Leonardo da Vinci, by the way, in his notebooks referred to the pinhole as the “spiraculo” (‘aperture’, ‘hole’), a word related to Latin “spiraculum” (‘air-hole’, ‘opening’, ‘outlet’) and “spiraglio” (‘little opening’) in modern Italian. JG
Sir William Crookes, John Spiller and William de Wiveleslie Abney, all
in England, were other early photographers to try the pinhole technique.
The oldest extant pinhole photographs were probably made by the English
archeologist Flinders Petrie (1853–1942) during his excavations in Egypt
in the 1880s. Two of Petrie’s photographs are reproduced in Renner (1995:39,40). It should be noted that Petrie’s camera had a simple lens in front of the pinhole, thus it was not truly a pinhole camera.
Pictorialism and Popular Pinhole Photography
By the late 1880s, the Impressionist movement in painting exherted a
certain influence on photography. Different schools or tendencies
developed among photographers. The “old school” believed in sharp focus and
good lenses; the “new school”, the “pictorialists”,
tried to achieve the atmospheric qualities of paintings. Some of the
pictorialists experimented with pinhole photography. In 1890, George
Davison’s pinhole photograph An Old Farmstead (later called The Onion Field) won the first award at the Annual Exhibition of the Photographic Society of London. The award was controversial and led to a
schism in the Photographic Society of London (soon to become the Royal
Photographic Society) which resulted in the formation of the well-known
pictorialist group, the “Linked Ring”. George Davison’s picture is reproduced in Renner (1995:42), and in several histories of photography, e.g. Michael Langford’s The Story of Photography (Oxford: Focal Press 1992. p. 106), The Magic Image. The Genius of Photography, edited by Cecil Beaton and Gail Buckland (London: Pavilion Books Ltd. 1989. p. 79), Naomi Rosenblum’s A World History of Photography (New York: Abbeville Press 1984, p. 310). and in A New History of Photography, edited by Michel Frizot (Köln: Könemann 1998. p. 298).
In the 1890s, the Swedish dramatist August Strindberg (1849–1912) started experimenting with pinhole photography. He built his own camera and called it a Wunderkamera. About one hundred of Strindberg’s photographs are preserved, of these three or four are pinhole images.
Pinhole photography became popular in the 1890s. Commercial pinhole
cameras were sold in Europe, the United States and in Japan. 4000 pinhole
cameras (“Photomnibuses”) were sold in London alone in 1892. The cameras
seem to have had the same status as disposable cameras today – none of the
“Photomnibuses” have been preserved for posterity in camera collections.
Some years earlier, an American company had actually invented a disposable
pinhole camera, the “Ready Photographer”, consisting of a dry glass plate,
a pinhole in tinfoil and a folding bellows. Another American company sold
“the Glen Pinhole Camera“, which included six dry plates, chemicals,
trays, a print frame and ruby paper for a safelight. The very first commercial pinhole camera was designed by Dehors and Deslandres in France in 1887. Their camera had a rotating disc with six pinholes, three pairs of similar sizes. Pictures of these cameras are found in Renner (2008:59–60). In Italy, Luigi Sassi published a 135 page manual on pinhole photography in 1905, La fotografia senza obiettivo.
Mass production of cameras and “new realism” in the 20th century soon
left little space for pinhole photography. By the 1930s the technique was
hardly remembered, or only used in teaching. Frederick W. Brehm, at what was
later to become the Rochester Institute of Technology, was possibly the
first college professor to stress the educational value of the pinhole
technique. He also designed the Kodak Pinhole Camera around 1930.
The Revival of Pinhole Photography
In the mid-1960s several artists, unaware of each other, began experimenting with the pinhole technique – Paolo Gioli in Italy, Gottfried Jäger in Germany, David Lebe, Franco Salmoiraghi, Wiley Sanderson and Eric Renner in the USA. Coincidentally, many of these artists were working with multiple pinholes. Wiley Sanderson was a professor of photography at the University of Georgia and taught pinhole photography from 1953 to 1988. During that period his students built 4356 pinhole cameras (Renner 1995:53).
Two scientists were also working with pinhole photography, Kenneth A. Connors in the USA and Maurice Pirenne in Great Britain. Connors did research on pinhole definition and resolution. His findings were printed in his self-published periodical Interest. Pirenne used the pinhole to study perspective in his book Optics, Painting and Photography (1970).
In 1971 The Time-Life Books published The Art of Photography in
the well-known Life Library of Photography and included one of Eric
Renner’s panoramic pinhole images. The June 1975 issue of Popular
Photography published the article “Pinholes for the People”, based on
Phil Simkin’s month-long project with 15,000 hand-assembled and preloaded
pinhole cameras in the Philadelphia Museum of Art. (People came into the
museum, picked up a camera, made an exposure. The images, developed in a
public darkroom in the museum, were continually displayed in the museum.)
In the 1970s pinhole photography gained increasing popularity. Multiple
pinholes became rare. Many pinhole photographers experimented with
alternative processes. A number of articles and some books were published,
among them Jim Shull’s The Hole Thing: A Manual of Pinhole
Photography. Stan Page of Utah, a leading historian of pinhole
photography, collected 450 articles on pinhole photography published after
1850. In the USA, however, critics tended to ignore pinhole photography in
art, whereas Paolo Gioli and Dominique Stroobant received more attention
in Europe. In Japan Nobuo Yamanaki started making pinhole camera obscuras
in the early 1970s. Although pinhole photography gained popularity, few of
the artists were aware of the others’ images. A diversity of approaches
and cameras developed.
In 1985 Lauren Smith published The Visionary Pinhole, the first
broad documentation of the diversity of pinhole photography. The first
national exhibition of pinhole photography in the USA was organised by
Willie Anne Wright, at the The Institute of Contemporary Art of the Virginia Museum in 1982. In 1988 the first international exhibition, “Through a Pinhole Darkly”, was organised by the Fine Arts Museum of Long Island. Cameras and images from forty-five artists were exhibited. A second international exhibition was organised in Spain the same year, at The Museum of Contemporary Art of Seville, comprising the work of nine photographers. A third international exhibition followed at the Center for Contemporary Arts of Santa Fe in New Mexico, also in 1988. According to Renner (1995:94), James Hugunin’s essay “Notes Toward a Stenopaesthetic”, in the catalogue of the Santa Fe exhibition, represents the most thorough analysis of pinhole photography in the 1980s. Eric Renner’s book
Pinhole Photography – Rediscovering a Historic Technique, published in 1995 (fourth edition 2008), mentions a large number of pinhole artists active in the 1980s and has samples of their work.
According to Renner (1995:90) at least six commercial pinhole cameras
were manufactured in the 1980s. In December 2003, according to my own research, there were at least 48 cameras on the market, from 18 manufacturers in the US, Europe, Australia and Asia.
The Pinhole Resource, an international information center and archive
for pinhole photography, was founded by Eric Renner in 1984. The first
issue of the Pinhole Journal appeared in December 1985. The journal ended publication after 22 years with the December, 2006 issue. Work by many pinhole artists from a number of countries had been published.
The Internet and Pinhole Photography
With the advent of the World Wide Web pinhole photography went online.
One of the first artists to publish his work on the Internet was Harlan
Wallach. By January 1995 Richard Vallon of Louisiana had established
the Pinhole Resource on the net.
In April 1997, the Pinhole Visions website was launched by Gregg Kemp to support pinhole photography as both an art form and a learning activity. For years it was the most important pinhole website, with news and events sections, gallery, links to resources, directory of pinhole photographers, web based discussion forums and a discussion list. In January 2004 it was scaled down and changed its name to The Pinhole News. Later it changed its name back to Pinhole Visions and remained the most important pinhole photography website. Unfortunately the site was closed down in August 2009.
In June 2004, the f295 discussion forum was established with a handful of members. By October 2008 the forum had nearly 2000 participants and over 1GB of stored, fully searchable, online information which included photographs, discussions, detailed plans and diagrams for camera building or modifying, and information on historic processes. The website, which was run by Tom Persinger, was discontinued in December 2015.
The first Worldwide Pinhole Photography Day (WPPD) was held on 29 April 2001. 291 participants from 24 countries contributed images. On the second WPPD in April 2002, 903 images from as many photographers from 35 countries were uploaded to the online gallery. In 2007 a total of 2943 photographs from 68 countries were uploaded. Two years later, in 2009, pinhole photographers from 69 countries uploaded 3205 images. A peach was reached in 2012 with 3865 photographers participating, Since then the number has decreased. 2033 photographers participated in 2019. After 2020 the number has been below 2000.
In 2009 Brian J. Krummel published his book The Pinhole camera. A Practical
Guide to Making Pinhole Cameras and Images. It is one of the best English language books on the subject, the authoritative reference work on pinhole photography being, of course, Eric Renner’s book.
In 2012 the Pinhole Resource Collection – 100 books, 56 cameras and 6000 photographs – was donated to the Palace of Governors Photo Archives at the New Mexico History Museum. The Photo Archives has already digitized hundreds of the images, which can be searched at http://econtent.unm.edu/cdm/search/collection/pinhole. An exhibition celebrating pinhole photography, Poetics of Light, was opened at the museum in June 2014.
In recent years, several pinhole photography groups have been established on Facebook.
Solargraphy
Around the turn of the millennium, some people start experimenting with “solargraphy”. They place a piece of photographic paper in a simple pinhole camera, often a beer or soda can, attach the camera to a pole, a wall, or some other immobile structure (preferably somewhat hidden so that the camera is not removed) and leave it there for days, weeks or months, often from one solstice to another. When they “harvest” the cameras, there will be an image of the sun’s path across the sky on the photographic paper. They remove the photographic paper in a dim room, then scan the negative and invert the colors. The whole process is done without any chemicals. If the position of the camera has been favorable, the result may be a beautiful image of the sun’s paths over the landscape.
- Instructions for solargraphy
- Justin Quinell: Solargraphy – How to create 6 month exposures
- Tarja Trygg: The Global Project of Solargraphy
- Tarja Trygg: Solargraphy – The art of catching the sun’s path through a pinhole camera
- Jeff McConnell: Solargraphs
- Jesus Joglar: Solargraphy
- Gregg D. Kemp: Paper Tests for Solargraphy
- The Solarcan Matrix Report
- History of solargraphy (Paweł Kula interviewed in Polish, English subtitles)
Pinhole Photography in Science
In the late Middle Ages, the pinhole was used to study the projection of
light through a small aperture. In the 16th century and later it was used
in astronomy to study solar eclipses. In the 1940s pinhole cameras found
their way into nuclear physics. It was discovered that pinhole cameras
could be used to photograph high-energy X-rays and gamma rays. Pinhole
cameras were deployed in spacecraft by the end of the 1950s and beginning
of the 60s to photograph X-rays and gamma rays from the sun. The first
X-ray pinhole photograph of the sun was made on 19 April 1960. The photo is
reproduced in Renner (2008:31). In the 1970s scatter-hole X-ray pinhole
cameras were made. Today’s pinhole cameras on space vehicles use multiple
pinhole optics. The last 20 years the pinhole has also been used widely by
nuclear physicists to photograph high energy in laser plasma (Renner
1995:21).
A few links to the use of pinhole cameras in science:
- Ariel V: October 1974 – March 1980
- The Polar Ionospheric X-ray Imaging Experiment (PIXIE)
- Astrophotography with a pinhole
Other Uses of the Pinhole
Pinholes are used in combination with a lens for photographing miniature models, e.g. model trains or architectural models. The pinhole increases the depth of field radically. Pinhole projectors are used for viewing solar eclipses. An image of the eclipsed sun is projected on a piece of cardboard. You can also make a pinhole projector with your hands. Do not ever look directly at the sun! Some photographers experiment with pinhole enlargers with one pinhole or multiple. And there are pinhole glasses and pinhole eye occluders for vision testing.
Cameras
Basically a pinhole camera is a light-tight box with a tiny hole in one end and film or photographic paper in the other.
Several commercial cameras are available. Most pinhole photographers, however, make their cameras themselves. The construction is simple.
Pinhole cameras may differ with regard to (a) focal length, (b) pinhole diameter, (c) number of pinholes, (d) image format, (e) flat or curved film plane, (f) type of light-sensitive material, and (g) other characteristics.
(a) Strictly speaking pinhole cameras have no focal length. They
have infinite depth of field. But for practical reasons the term “focal
length” is used here to refer to the distance between the pinhole and the
film or paper. Pinhole cameras may have short, normal or long “focal
lengths”; they may be anything from ultra wide-angle cameras to long
telephoto cameras. It should be noted that as the focal length increases,
the apertures decreases. In other words, exposure times get longer (see
Formulas below). (The formula for calculating the f-stop is f = v/d, where
f = aperture, v = distance from pinhole to film or paper, and d = pinhole
diameter.) Pinhole cameras produce fascinating wide-angle and ultra-wide
angle images. Unlike lens photographs, ultra wide-angle images remain
rectilinear. Straight lines are not curved at the periphery of the image.
Beginners should start by making a wide-angle camera.
(b) For any focal length there is an optimal pinhole diameter
for image sharpness. A number of formulas and charts have been produced.
Generally a smaller pinhole will produce a sharper image than a larger
one. If the pinhole gets too small, the image becomes less sharp because
of diffraction. See Formulas below.
(c) Pinhole cameras may have one pinhole or several. Multiple
pinhole cameras produce overlapping images or, with certain designs,
panoramic images. Beautiful images made with a multiple pinhole camera are
found in Knuchel (1991: cover, p. 35). The beginner should start with a
camera with a single pinhole. My own experience is from single pinhole
photography exclusively. Some advanced pinhole photographers sometimes use
a slit instead of a pinhole. For a beautiful picture made with a single
slit camera, see Knuchel (1991:53).
(d) Pinhole cameras have widely differing image formats. Cameras
are made from match boxes, 35 mm film canisters, baking soda containers,
oatmeal boxes, cookie tins, bags or suitcases, big wooden cases etc. Vans
or station wagons have been used as pinhole cameras, and rooms in large
buildings.
Some cameras were made to take a 126 film cartridge, a format which was
discontinued by Kodak in December 1999. There are pinhole photographers who use 35 mm film (e.g. by removing the lens of a 35 mm SRL, taping or gluing a pinhole plate to a lenscap, and replacing the lens with the modified lenscap). A cheap 120 twin-lens reflex camera (e.g. a Russian-made Lubitel), an old 120 (non-collectible!) folding
camera, a 120 box or a Polaroid camera may fairly easily be turned into a
pinhole camera. Some pinhole photographers use a large format camera, 4 x
5 in., 5 x 7 in. or 8 x 10 in., and replace the ordinary lensboard with a
lensboard with a pinhole plate. Some make a lensboard with a pinhole
turret, i.e. a disc with a circular configuration of pinholes in various
sizes.
Most pinhole cameras, however, are made from an ordinary box or
container, with a pinhole plate in one end and a simple mechanism for
holding the paper or film in the other. Often the film or paper is just
taped to the inside of the box. Many pinhole photographers start out with
an “oatmeal box camera”, a camera made from a cylindrical container in
cardboard or metal.
In my view, best results are achieved with medium or large format film
or with photographic paper in similar sizes or larger. In many areas 120
roll film is more easily available than sheet film.
(e) A pinhole camera may have a flat or curved film or image
plane. If the film plane is flat, there will be some light fall-off or
vignetting at the corners in a wide-angle or ultra wide-angle pinhole
camera. The image may be overexposed at the center and underexposed at the
corners. This vignetting, however, may be exploited consciously as an
esthetic effect. If one wants to avoid the light fall-off, the film plane
should be curved so that the film at any point is roughly at the same
distance from the pinhole. A pinhole camera may be made from a round
(“cookie”) container cut in two to form a semi-circular box.
Film or paper is taped to the circular wall of the box. Many pinhole
photographers also make can cameras with curved film planes. In my own pinhole photography I use flat film planes.
With flat film planes a pinhole has a usable circular image of approx.
125 degrees. The image diameter is about 3 1/2 times of any focal length.
The image will fade towards the edges because of the increasing focal
distance. With curved film planes a pinhole camera may have a larger
circle of coverage (approximately 160 degrees).
Some photographers experiment with complex film planes. Examples are found in Knuchel 1991, which is an interesting source for studying the relationship between image and camera. The film plane, flat or curved, may be radically slanted or angled in relation to the pinhole (anamorphic pinhole cameras). Light falloff will be severe, and the negatives may require burning and dodging in the darkroom or in the digital postprocessing. A simple anamorphic camera is a tube with a pinhole at the end. The Omniscope Anamorph Camera, to my knowledge the only commercially available anamorphic camera, produces a 360 degree anamorph on 120 roll film.
(f) Pinhole cameras may take film or photographic paper. Black
and white film and color film for prints have more exposure latitude than
chrome film. XP2 for black and white (available in 35 mm, 120 format and
4 x 5 in.) has extraordinarily wide exposure latitude and may be exposed
as anything between ISO 50 and 800. The latitude makes it ideal for
pinhole photography. Photographic paper for black and white has a low ISO
rating. Some photographers recommend mat-surfaced RC paper for curved image planes (paper curved in a can camera) to avoid a reflected fogged strip. Glossy paper
may be used in cameras with flat image planes, where light will not be
reflected. Some photographers use Ilfochrome paper with great success. An
85B filter (sometimes in combination with an 81 or 82 series filter) may
be used to change tungsten light to daylight. Because of long exposures
reciprocity failure will often have to be taken into account when
calculating exposure both for film and paper.
(g) Pinhole cameras may also differ with regard to other
characteristics.
Cameras are made from different types of material: cardboard,
wood, metal or other. For the beginner a camera made of cardboard may be
the best choice. Cardboard is easy to work with.
Some photographers use a grey neutral density filter to increase
exposure times when using film where exposure times are short. Filters may
also be used to control contrast in multigrade papers.
Many homebrew cameras have only a plastic flap or a piece of cardboard
for “shutter”. Wooden cameras may have a simple moveable shutter. With short exposure
times it is important that the shutter opens easily without vibrations.
Some photographers make a viewing frame, e.g. by cutting a
window the same size as the pinhole image in a piece of cardboard. A wire
frame attached to the camera is another solution. The viewing frame is
held at the same distance from the eye as the distance between the pinhole
and the film in the camera. Pinhole photographers who use a large format
camera sometimes use a larger viewing pinhole when composing the
image. In my own pinhole photography I never use viewing frames. I tend to
work for longer periods with the same camera and find I get a pretty good
feeling of the image field.
Some pinhole cameras are beautiful objects in themselves. The
Swiss pinhole photographers Peter Olpe has made cameras from cardboard in
the shape of small castles and buildings (Olpe 1992). The cameras are
themselves objects of art and have been exhibited as such.
I suggest the beginner starts by making a can camera or a
cardboard camera.
Making a Pinhole Camera
The Pinhole
The most important part of a pinhole camera is the pinhole itself.
Precision made pinholes may be bought. However, there is no reason why you should not make the pinhole yourself.
The hole is made in a thin piece of metal, brass shim (available in
some car supply stores) or metal from the lid of small box or glass
container (bought at a supermarket ). Some use aluminium foil from a
disposable baking pan. Ordinary aluminium foil is too thin. My own
experience is with brass shim and thin metal from container lids.
If the metal is taken from a container lid, it should be sanded
carefully with ultra-fine emery paper (e.g. # 600) to remove any paint or
varnish and to make it thinner. The hole is made with a needle. The edge
of the hole should be sharp. The optimal diameter depends on the focal
length of the camera, i.e. the distance from the pinhole to the film or
photographic paper. Some formulas and charts are reproduced below. In
general: the smaller the hole, the sharper the image. If the hole is too
small, however, the image gets less sharp because of diffraction effects
(light is bent around the edge of the pinhole).
Place the piece of metal on top of some hard cardboard. Carefully poke
a hole with a needle taking care that the hole is as round as possible.
The needle may be put through a cork to make it easier to handle. Or you
may put masking tape on the head of the needle. Hold the needle steadily
in a 90 degree angle to the surface. Turn the piece of metal and sand the
back side carefully with fine-grained emery paper to remove the burr or
debris where the needle point has penetrated. (The edges of the pinhole
should be sharp). Then place the metal on the cardboard back side up and
cautiously spin the needle in the hole to make sure the hole is round. The
hole can be checked with a magnifier or an enlarger. You can also use an
enlarger or slide projector to check the diameter of the pinhole. Or you may
use a scanner, but be careful not to scratch the glass.
Can Cameras
Pinhole cameras can be made of many kinds of light-tight containers. A cylindrical cardboard container, e.g. an oatmeal box or a herb tea container, is easily converted into a pinhole camera for pieces of 120 roll film or photographic paper.
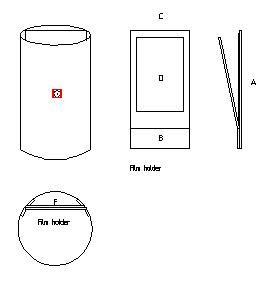
- Start by making a cardboard film holder. The film holder is made of
two pieces of cardboard which fit the internal dimensions of the
cylindrical box (Sketch). One piece (A) serves as the back of the film holder. The other piece is cut in two, one small piece (B) which is glued to A and a larger piece (C) with a cut-out window (D) for the film or paper. Use some good tape (electrical tape or other) to attach piece C to B. The film holder will
be loaded in a darkroom by placing a piece of 120 roll film or
photographic paper between A and C. - The film holder fits into a groove on either side of the box. The
groove is made by gluing cardboard strips to the insides of the box (Sketch). You may make a supporting back (E) for the film holder by gluing a piece of cardboard in the groove. This will make it easier to slide the loaded filmholder into the groove. - Spray the insides of the box (including the lid), and the outsides
of the cardboard film holder, with flat black spray paint. Make sure the
lid is not translucent. If necessary glue some black plastic lining or
cardboard to the lid to make it opaque. - Make a hole in the front of the box. The “optical axis” should
extend to the center of the window in the film holder – provided you are
not looking for special off-center effects. - Then make the pinhole plate. See above.
- Tape the pinhole plate to the front of the cylindrical box.
- Make a simple shutter by taping a flap of black plastic over the pinhole, e.g. plastic from a photographic paper package. The flap may be held in place by tape and a rubber string. When you take a picture you remove the string, open the flap for the necessary exposure and close it.
- If you want a tripod mount or socket for your camera, use some
araldite to glue a 1/4″ or 3/8″ nut to the bottom of the box. - Since this camera has to be loaded in the darkroom, it will be
practical to make several cameras. The cameras are easily carried in a
bag. - If you want a curved film plane for your camera, the cardboard film holder is left out. Film or paper is taped to the inside of the camera.
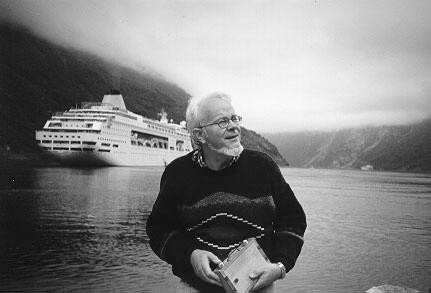
A polaroid picture of some “oatmeal box” pinhole cameras
which I made in 1990, my first pinhole cameras, and a self-portrait made with one
of the cameras on Ilford Multigrade III RC paper. Some descriptions or pictures of “oatmeal box” or “cookie tin” cameras on the net:
- How to Make an Oat Meal Tin Camera (Zero Image)
- Making Oatmeal Box Pinhole Cameras (Stewart L. Woodruff)
4 x 5 in. Film Holder Cameras
Some commercial cameras are manufactured for 4 x 5 in. or 8 x 10 in.
sheet film. In my view, these cameras tend to be somewhat overpriced.
Making a camera yourself is easy. The camera can be made of wood or
cardboard. I build my own cameras from hardwood, mainly because I like
woodworking and enjoy making beautiful objects in wood. Plywood or other
materials may be used as well and require less effort. Cardboard is
probably the easiest material to work with.
A cardboard camera may be made from scratch from sheets of
cardboard cut to the right dimensions and assembled to form a box which
will take a 4 x 5 in. film holder. It may also be made from an already
existing cardboard box. The basic component – apart from the pinhole plate
– is the film holder. The back of the camera is designed to accommodate a
standard film holder. The inserted film holder may be held in place by a
rubber string. Make sure the camera back is light-tight. Near the top the
film holder has a locating ridge which is to fit in a groove in the camera
back. The groove may be made by gluing strips of cardboard to the back.
Some simple sketches of a 4 x 5 inch film holder camera made of cardboard:
I usually use 6 x 30 mm oak strip (1/4″ x 1 1/4″) as the basic material
for wooden cameras for 4 x 5 in. film holders. The strips are glued
together to form 6 mm sheets. The sheets are sanded carefully, cut to the
right measurements and glued together to form a box with a simple spring
back for the film holder. The following is a general description of the
construction of a wooden 4 x 5 in. camera:
- Get a 4 x 5 in. film holder.
- Make a box of wood (Sketch 1). The internal width should be about 20
mm wider than the film holder. The bottom piece (A) and the side pieces
(B) should be about 40 mm longer than the top piece (C). Sand the wood
carefully before assembling the pieces. - Square moulding is glued to the internal angles in the camera to
make the construction stronger. Sketch x. - The back panel (D) is made of plywood. A window (E) is cut in the
back panel, the same size as the film holder’s window (dimensions
…). - A groove (F) is made in the back piece for the film holder’s
locating ridge. - Two strips of wood (G), approximately 6 mm thick, are glued to the
back panel, one on the the left side, the other on the right side of the
film holder. - Two leaf springs (H) are made of a flexible sink drain (available at
a reasonable price in some hardware stores). - Each leaf spring is kept in place by a small piece of wood (I)
screwed on to the side pieces. - A hole (J) is made for the pinhole in the front panel.
- The pinhole plate (P) is attached to the inside of the front panel.
A piece of wood (K) with a hole covers the pinhole plate; the piece of
wood is screwed on to the front piece from the inside. - A pressure panel (L) for the film holder is made of wood.
- Two strips of 1 1/2 or 2 mm brass strip (M), to go under the leaf
springs, are screwed on to the pressure panel. - A handle (N) may be attached to the side panel of the camera.
A piece of cardboard is used for shutter, or a moveable shutter is
added (O). For short exposures a cardboard is most practical as removing
the cardboard creates no vibrations.
The same design may be used for a 5 x 7 in. camera or an 8 x 10 in. camera. For an 8 x 10 in. camera 8–10 mm board or plywood may be used as the basic material.
Polaroid pictures of some of my hardwood cameras for sheet film
holders:
Box Cameras for Photographic Paper
A box camera for photographic paper can be made of a light-tight
cardboard box, from sheets of cardboard or from wood. Peter Olpe (1993)
has plans for a nicely constructed cardboard camera.
I usually use wood for box cameras for photographic paper. Most of my
cameras are constructed for the format 18 x 24 cm (approx. 8 x 10 in.).
The focal lengths differ but all are wide-angle cameras. My preferred 18 x
24 cm camera has a focal length of 87 mm. My “Oslo Revisited” photographs were made with this camera.
Although it is easy to make a simple moveable shutter for these cameras
most of the cameras have just piece of cardboard which is taped to the
camera and opened or removed during exposure. For some of my box cameras I
have made a reducing back for 4 x 5 in. sheet film. Sketch of wooden camera:
Polaroid pictures of some of my cameras for photographic paper or sheet film:
Camera for 120 Roll Film
Cameras for photographic paper have to be loaded in the dark or under a
safelight. They usually take only one sheet of paper at a time. This
somewhat laborious process makes photography slow. The slowness may be an
advantage – the photographer tends to plan his images carefully. But if
you want to take more than one picture you will have to bring several
cameras. Sheet film cameras and cameras for 120 roll film are practical
for photographic tours.
Some pinhole photographers modify an existing 120 roll film camera by
removing the lens and replacing it with a pinhole plate. Others make their
own cameras. Peter Olpe (1993) has plans for a cardboard camera for 120
roll film. The text is in German.
In 1991 I constructed a 120 roll film camera made of hardwood. I used
oak bought at a local lumber yard. The camera has a flat film plane. The
negative format is approximately 60 x 70 mm, and the focal length 45 mm. I
usually use the camera for XP2 black and white film or Fujichrome Velvia. My “Pinhole Photographs 1997–98” were made with this camera.
- Sketches of my 120 roll film camera
- Pictures of my pinhole cameras for roll film and roll film holders
Shutters for Pinhole Cameras
I usually use a piece of opaque plastic or a piece of cardboard, attached to the camera with tape, for a shutter. It may not be a very elegant solution, but it is very practical. More elaborate shutters can be made. The essential thing is that the shutter is lightproof when closed and that the camera is not stirred when the shutter is opened and the exposure is made.
Pinhole camera shutters may be divided into different categories: (1) flap/tape/piece of cardboard;
(2) sliding shutters made of cardboard, wood or metal; (3) swinging shutters made of the same materials;
(4) cable release shutters (slide or swing); (5) magnet shutters, and others. If you are modifying a TLR or another roll film camera, you may be able to use the original shutter.
Pinhole Body Caps
A 35 mm or medium format SLR may be equipped with a pinhole body cap.
You may make the body cap yourself or buy a manufactured pinhole body cap.
There are several on the market, also for some rangefinder cameras.
Some pinhole body caps are dustproof, which is particularly important for digital SLRs.
These body caps have a film base pinhole – the pinhole is not a physical
hole but a perfectly round clear tiny dot on opaque black film. Because it is
not a physical hole no dust can get into the camera. But care has to be taken
to avoid dust when you change from lens to body cap. If you modify a body cap yourself, you may make the pinhole dustproof by gluing a microscope slide “cover plate” over the hole.
My pinhole photos from Rome in 2007 were made with a commercial pinhole body cap on a film based SLR. It was the first time I used 35 mm film for pinhole photography. It made me realize that 35 mm pinhole negatives may be enlarged to a considerable extent and still yield good prints. The quality of the pinhole bodycap was excellent.
More Cameras
Links to descriptions and photographs of various types of cameras:
Various Types
35 mm Pinhole Cameras
- The populist (templates)
- The Dirkon paper camera (templates)
- Making 35mm
film-can pinhole cameras (Stewart Lewis Woodruff) - How to build a matchbox pinhole camera (alspix)
Medium Format Pinhole Cameras
Large Format Pinhole Cameras
- Pinhole camera (Christopher Schwarz, Popular Woodworking)
- Lochkamera zum Selberbauen (in German)
- Beautiful wooden 4 x 5 cameras
- 4 x 5 camera
- 8 x 10 Pinhole View Camera Project
- Beautiful wooden 8 x 10 Pinhole camera for photographic paper
- 4 x 5 Pinhole Box Camera
- B & J 4 x 5 Pinhole Camera
- Réalisation d’une chambre sténopé 4 x 5 (in French)
- Construction d’un sténopé grand format 4 x 5 (in French)
Panoramic Pinhole Cameras
Multiple Pinhole and Anamorphic Cameras
- Chris Compat: Creating a Pinhole Camera with 25 Pinholes Using a Shoebox
- Flickr: Miltiple Pinhole Camera
- Instructable: Build an Anamorphic Pinhole Camera
- Roger Cline: Super Easy Anamorphic Coffee Can Camera
- Lomography: Anamorphic Pinhole Fun
Ultra Large Pinhole Cameras
- Solar eclipse pinhole projector
- Suitcase pinhole camera (1)
- Suitcase pinhole camera (2)
- Trash can camera
- TMariano Dallago’s camera
Van Cameras
Camera Obscuras with a Lens
- Instructions for building a camera obscura (Amateur Work Vol. IV)
- Camera oscura – invenzione di madre natura
(Gino Mazzanobile & Stefano Fedele, in Italian)
Camera Becomes Image: Cameras Made of Photographic Paper or Other Light Sensitized Material
Other Pinhole Cameras
- Ceramic pinhole cameras (Spot the Pot)
- Pinhole cameras powered by watch movements
- “The World’s Largest Pinhole Photograph”
- A face-mounted pinhole camera
- Terrence Dinnan and Dominique Stroobant, Earth Camera, 1980
- Paolo Gioli, shell cam, 1986
- Pinhole camera inside an egg
- PinHolo, Pine nut pinhole camera
- Coconut pinhole camera (Kotama Bouabane)
- Pumpkin pinhole camera
- Eric Renner’s red pepper camera (Polish)
- Pinhole in the Berlin Wall (Marcus Kaiser, 1990)
Digital Pinhole
Videos on Camera Construction
- Joe Van Cleave: Four pinhole camera designs
- Weekend project: Make a pinhole camera (video in English)
- Build a 4 x 5 pinhole camera (video in English)
- Polaroid super shooter pinhole camera Conversion (video in English)
- Medio Siglo: La cámara estenopeica (video in Spanish)
- Gino Mazzanobile: La fotografia stenopeica (video in Italian)
- How to transform i room into a camera obscura (Howcast.com)
After this, rather long, list of pinhole camera links it may be in place to remind the reader that pinhole images – like other photos – in the final analysis are made not by the camera but by the photographer. Very simple cameras may produce great images, as for instance this pinhole photo, which was made with a matchbox camera by a Polish photographer.
Formulas
According to Eric Renner, at least 50 charts suggesting optimal pinhole diameters have been devised in the last 125 years (Renner 1995:118). In my own reading the last fifteen years I have come across about fifteen charts or formulas, a few of which may be derived from the same basic formulas. It should be noted that the diameter of the pinhole is not really critical. But for every focal length there is an “optimal” diameter, i.e. a diameter which produces the sharpest possible image.
The word optimal actually is not a felicitous term, since the pinhole photographer or artist may not be striving for the greatest possible sharpness. There are beautiful pinhole images which are intentionally softer than what is technically possible. A good pinhole image is something else than a blurred, out of focus, lens image.
Up to a certain point a small pinhole will produce a sharper image than
a larger one. If the pinhole is too small, the image gets less sharp
because of diffraction. The hole should be perfectly round, without ragged
edges. It may be checked with a magnifier or an enlarger.
Joseph Petzval of Vienna apparently was the first, in 1857, to attempt to find a
mathematical formula of the optimal pinhole diameter for the sharpest
definition in a pinhole image. The British Nobel Prize winner Lord
Rayleigh (John William Strutt, 1842–1919) worked on pinhole diameter
formulas for ten years and published his work in Nature in 1891.
Lord Rayleigh’s formula for subject distances above 1 meter may be
written as follows:
d = 1.9 * sqrt (l * f),
where d = pinhole diameter, l = wavelength of light and f = focal length or distance from pinhole to light-sensitive material. For the wavelength of light different average values may be
substituted. Often the value of the yellow-green spectrum is used, i.e.
0.00055 mm.
A number of other formulas have been published since the 1880s. According to Renner (1995: 117), most formulas used today are of the following general form:
r = sqrt (l * c * f)
r = pinhole radius
l = wavelength of light
c = a constant, usually a decimal fraction between 0.5 and 1
f = focal length
When I started doing pinhole photography in 1990, I used a chart published by Tore Holter in the Norwegian magazine Fotografi, no 5, 1990:
| Focal length (mm) | Pinhole diameter (mm) | f-stop | Exposure factor for f/16 |
|---|---|---|---|
| 10 | 0.14 | 70 | 20 |
| 20 | 0.20 | 100 | 40 |
| 30 | 0.24 | 125 | 60 |
| 40 | 0.28 | 140 | 80 |
| 50 | 0.31 | 160 | 100 |
| 60 | 0.34 | 180 | 125 |
| 70 | 0.37 | 190 | 140 |
| 80 | 0.40 | 200 | 160 |
| 90 | 0.42 | 214 | 180 |
| 100 | 0.45 | 220 | 190 |
| 150 | 0.54 | 280 | 300 |
| 200 | 0.63 | 318 | 400 |
| 250 | 0.70 | 360 | 500 |
| 300 | 0.78 | 380 | 560 |
| 350 | 0.84 | 418 | 700 |
| 400 | 0.89 | 450 | 800 |
In later years, I have also been using Larry Fratkin’s pinhole calculator or the formula provided by the Pinhole FAQ: (pinhole diameter = 0.03679 * sqrt (focal length in mm). A table based on the formula in the Pinhole FAQ:
| Focal length (mm) | Pinhole diameter (mm) | f-stop |
| 10 | 0.12 | 85 |
| 20 | 0.17 | 121 |
| 30 | 0.20 | 148 |
| 40 | 0.23 | 171 |
| 50 | 0.26 | 191 |
| 60 | 0.29 | 209 |
| 70 | 0.31 | 220 |
| 80 | 0.33 | 242 |
| 90 | 0.35 | 256 |
| 100 | 0.37 | 270 |
| 150 | 0.45 | 331 |
| 200 | 0.52 | 382 |
| 250 | 0.59 | 427 |
| 300 | 0.64 | 468 |
| 350 | 0.69 | 506 |
| 400 | 0.74 | 541 |
The formula in the Pinhole FAQ is the same as the one used in Robert Mikrut and Kenneth A. Connors’s table in Renner 1995: 119.
Larry Fratkin’s calculator gives basically the same diameters as those provided by Holter’s table, which are somewhat larger than those based on the formula in the Pinhole FAQ.
- Larry Fratkin’s Online Pinhole Calculators
- David Balihar’s PinholeDesigner for Windows
- The Pinhole FAQ
Postscript
Photographers photograph in varying degree for (a) the experience or
for (b) the images. When you photograph for the experience, the emphasis
is on the process itself – the pleasure of the making a pinhole
camera, the pleasure of planning pictures, and the pleasure of making
pictures with a simple device. When you photograph for the images, the
emphasis is mainly on the result. The pinhole camera is basically
an imaging device with potentials which other cameras or techniques do not
possess, e.g. softness of definition, infinite depth of field,
rectilinearity.
In photography certain subjects may be better suited
for a particular technique than others. Photojournalists, for example,
normally use 35 mm SLRs in their work. Portrait photographers often use
medium format cameras. Architecture is best rendered by large format
cameras. Also in pinhole photography some subjects are better suited than
others. Long exposures exclude certain subjects, softness of definition
exclude others. Infinite depth of field and rectilinear ultra wide-angle
images represent a special potential.
Beginners should start with subjects with clear graphic shapes or
bright colors in sunlight. Cityscapes tend to make better pictures than
rural landscapes with their soft lines and softer shades of color or grey
tones – at least for the beginning pinhole photographer. Portraits may
prove slightly more difficult than still lifes, objects, structures,
buildings and cityscapes.
Literature
The following bibliography is basically a list of some of the literature I used when I wrote the first version of this article in 1996. A few entries have been added.
1 History
Aristotle. Problems. I. Books I-XXI. With an English translation
by W. S. Hett, M.A. London: William Heinemann Ltd., 1936
Eder, Josef Maria. Geschichte der Photographie. Halle a. S:
Verlag von Wilhelm Knapp, 1905. (Chapter Three: “Zur Geschichte der Camera
obscura”, pp. 26–38.)
Eder, Josef Maria. History of Photography. Transl. Edward
Epstean. New York: Columbia University Press, 1945
Essential Vermeer : Vermeer and the Camera Obscura. http://www.essentialvermeer.com
Hammond, John H. The Camera Obscura. A Chronicle. Bristol: Adam
Hilger Ltd., 1981. 182 pages. ISBN 0-85274-451-X
Potonniée, Georges: Histoire de la découverte de la photographie. Paris: P. Montel 1925.
Renner, Eric. Pinhole Photography : Rediscovering a Historic
Technique. Boston and London: Focal Press 1995. 176 pages. ISBN
0-240-80231-4. Third edition 2004, 272 pages, ISBN 0-240-80573-3. Fourth edition 2009, 259 pages, Pinhole Photography : From Historic Technique to Digital Application. ISBN 9780240810478
Steadman, Philip: Vermeer’s Camera : Uncovering the truth behind the masterpieces. Oxford University Press 2001
2 General (Including Cameras and Formulas)
Adams, Ansel. The Camera. Boston, Toronto, London: Little, Brown
and Company 1991. pp. 3–6
Bogre, Michelle. “Pinhole Revival”. Popular Photography, January
1988, pp. 46–53
Bogre, Michelle. “A Small Window of Opportunity. Pinhole Photography
reappears after 50 years”. American Photographer, December 1987, p.
18
Brenner, Paul. “Making your own Pinhole Camera”. View Camera,
July–August 1996, pp. 58–59
Brenner, Paul. “Pinhole Cameras”. View Camera, September–October
1995, pp. 44–46
Campana, Irene. La fotografia stenopeica : Storia ed evoluzione di una tecnica. Università di Bologna 2004
Chernewski, Anita. How-To Make Three corrugated 8 x 10 Pinhole Cameras: Wide-angle, Normal, Telephoto. The Pinhole Format Co. 1999. 16 pages
Clerc, L.P. Photography : Theory and Practice. London and New York: Focal Press 1972, pp. 61–62
Die Lochkameras von Peter Olpe. Ausstellung in der Buchhandlung ‘das Labyrinth’, Basel/Nadelberg 17, 19. November 1992 bis 2. Januar 1993. Basel 1992. n.p.
Dobson, Michael. “Pinhole Power”. Amateur Photographer, 23 March 1991, pp. 52–53
Dvoracek, Nick: Pinholica : Photographs and musing on pinhole photography. http://pinholica.blogspot.com/
Eastman Kodak Company. How to Make and Use a Pinhole Camera. 1968. 12 pages
Evans, John. “Custom Cameras : Spare Parts”. Amateur
Photographer, 9 December 1995, pp. 46–48
Evans, John. Adventures With Pinhole and Home-Made Cameras. Rotovision 2003. 144 pages
Fuller, Tom. “The Pinhole Resource : At the Point of Lensless Photography”. Camera and Darkroom, February 1992, pp. 44–49
Holst, Trond Kjetil. “Hvem trenger elektronikken?” Fotografi, 5, 1990, pp. 48–49. Oslo 1990
Holter, Tore. “Bygg ditt eget kamera av en kakeboks”. Fotografi, 5, 1990, pp. 44–47. Oslo 1990
Howard, Dave. “Painless Pinhole : Small Format Photography Gets Off The Sidelines.” Shutterbug, June 1998, pp. 42–48
Joseph, Cathy. “Through the Pinhole”. Amateur Photographer, 8 January 1994, pp. 20–21
Keeney, Chris. Pinhole Cameras : A Do-It-Yourself Guide. New York: Princeton Architectuaal Press 2011. 191 pages
Krummel, Brian J. The Pinhole Camera A Practical How-To Book for Making Pinhole Cameras and Images. 2009. 210 pages
Langford, Michael. The Book of Special Effects Photography. New York: Alfred A. Knopf 1981. pp. 32–33 and 146
Laverrière, Sophie. Chasseur d’images. Paris: Editions Gallimard 1974. pp. 88–93
Laverrière, Sophie. Fotografering er gøy. Oslo: Gyldendal Norsk Forlag 1975. pp. 88–93. (Norwegian translation of the preceding.)
“Make a Pinhole Camera”. Photography, August 1954, pp. 46–49 and 90–91.
Martyn, Roger. “A Hole in One”. Practical Photography, August 1992, pp. 58–61
Marzocchini, Vincenzo. La fotografia stenopeica in Italia : Storia tecnica estetica delle riprese stenoscopiche. Bologna: Clueb 2006. 127 pages
Merz, Reinhard / Findeisen, Dieter. Fotografieren mit der selbstgebauten Lochkamera. Augustus Verlag, 1997
O’Brien, Renee Creager. The Post-Romantic Vision of Contemporary Pinhole Photograpers. PhD thesis. New York University 1998. 311 pages
Olpe, Peter. Die Lochkamera. Funktion und Selbstbau. Lindemanns Verlag 1993. 48 pages
Pershinger, Tom (ed.): Photography Beyond Technique : Essays from F295 on the Informed Use of Alternative and Historical Photographic Processes. New York: Routledge 2017
Platt, Richard. The Professional Guide to Photo Data. Manchester: Mitchell Beazley, 1989. p. 73
Quinell, Justin. “Make your own 126 pinhole camera”. Amateur Photographer, 8 january 1994, pp. 23
Renner, Eric. Pinhole Photography : Rediscovering a Historic Technique. Boston and London: Focal Press 1995. 176 pages. ISBN 0-240-80231-4. Third edition 2004, 272 pages, ISBN 0-240-80573-3.
Fourth edition 2008, 272 pages, Pinhole Photography : From Historic Technique to Digital Application. ISBN 9780240810478
Resnick, Mason and Wolff, Ilan. “Persistently Pinhole”. Modern Photography’s Film Guide, 1989, pp. 48–49 and 94
Sassi, Luigi. La fotografia senza obiettivo. Milano: Ulrico Hoepli 1905. 135 pages
Schmidt-Ploch, Ulrich Clamor. Die Lochkamera : Abbildungsoptimierung : Physikalische Hintergründe. Freibrug i.Br.: SP-Verlag. 155 pages
Schriever, J.B. Complete Self-Instructing Library Of Practical Photography. American School Of Art And Photography 1909. Part III: Volume 3 Chapter XXV Pin-Hole Photography
Shadeck, John. Pinhole Photography in Art Education. Marston Gate 2010. 71 pages
Shull, Jim. The Hole Thing : A manual of Pinhole Photography. New York: Morgan & Morgan, 1974. 64 pages
Shull, Jim. The Beginner’s Guide to Pinhole Photography. Amherst Media. Inc., 1999. 80 pages
Smith, Lauren. The Visionary Pinhole. Salt Lake City: Gibbs M.
Smith, Inc., Peregrine Smith Books, 1985
Springer. J.F. “Pin-Hole Photography”. Scientific American, No. 21, 1920. New York, N.Y. 1920. [Page 574] [Page 584] [Page 586]
Talén, C.W. Amatørfotografen. Kristiania (Oslo): Steen’ske Bogtrykkeri og Forlag 1901. pp. 7–10
The Focal Encyclopedia of Photography. Desk Edition. London and New York: Focal Press, 1969. pp. 1124–1125
Vogel, François. Nouveau traité du sténopé / A New Treatise on the Pinhole Camera. Angers 2011. 160 pages
Voog, Geerlig. “Back to the basics. Drie Pinhole camera’s van de Lensless Camera Manufacturing Company of Santa Barbara.” Camera, 1, 1995, pp. 50–53
Wernersson, Mats. “Ta bilder utan objektiv”. Aktuell fotografi, 5, 1993, pp. 60–62. Stockholm 1993
Wiklund, Peter. “Den hålögda kameran.” Fotografi, 6, 1994, pp. 42–46. Helsingborg 1994
Young, Matt. “The Pinhole Camera, Imaging without Lenses or Mirrors.” The Physics Teacher, December, 1989
3 Images and Portfolios
Bachler, Thomas. Arbeiten mit der Camera Obscura. Lindemanns Verlag 2001. 95 pages. ISBN 3-89506-222-7. Text in German and English.
Baldassari, Luca. Un foro stenopeico a NordKapp. Blurb 2016. 106 pages
Derleth, Günter. Venice : Pinhole Camera Photographs. Zürich – New York: Edition Semmle 2000. 120 pages
Die Lochkameras von Peter Olpe. Ausstellung in der Buchhandlung ‘das Labyrinth’, Basel/Nadelberg 17, 19. November 1992 bis 2. Januar 1993. Basel 1992. n.p.
Ess, Barbara. I Am Not This Body. New York: Aperture 2001. 96 pages
Fuss, Adam. Pinhole Photographs. Washington and London: mithsonian Institution Press, 1996. 64 pages
Galley, Jean-Michel et Elisabeth Towns. Le sténopé. De la photographie sans objectif. PhotoPoche, [Arles:] Actes sud 2007. n.p.
Gosling, Steve. Lensless Landscapes. Papero Publishing, North Hampshire 2008. n.p.
Grepstad, Jon. Camera obscura 1992–2022. Oslo 2023. 201 pages
Grepstad, Jon. Pinhole Images 1992–2014. Oslo 2014. 79 pages
Jasud, Lawrence. “Tom Harding – Through a Pinhole Brightly”. View Camera, September–October 1995, pp. 4–8
Johnson, Lizabeth A. “Rebecca Sexton Larson – Visual Diaries”. View Camera, September–October 1995, pp. 22–28
Kemp, Gregg D. The North Carolina Outer Banks. Pinhole Photographs, 2003–2007. Blurb.com 2011. 28 pages
Knuchel, Hans. Camera obscura. Baden: Verlag Lars Müller 1992.
72 pages
Kuzmickas, Darius. Ocean Pinholes. Las Vegas: KuDa Editions 2006. 36 pages
Levinson, Edward. Timescapes Japan : A Pinhole Journey. Nippon Camera Publishing Co 2006. 108 pages
Morell, Abelardo. Camera Obscura. New York – Boston: Bulfinch Press 2004. 112 pages
Pinhole Journal. Published by Pinhole Resource (San Lorenzo, N.M.) 1985-2006. Edited by Eric Renner and Nancy Spencer
Renner, Eric. Pinhole Photography. Rediscovering a Historic Technique. Boston and London: Focal Press 1995. 176 pages. ISBN 0-240-80231-4. Third edition 2004, 272 pages, ISBN 0-240-80573-3.
Fourth edition 2008, 272 pages, Pinhole Photography: From Historic Technique to Digital Application. ISBN 9780240810478
Renner, Eric and Nancy Spencer: Poetics of Light. Contemporary Pinhole Photography. Santa Fe: Museum of New Mexico Press 2014. 209 pages
Schröder, Hartmuth. Der Besucher. Magister Hölderlin baut sich eine Lochkamera und macht eine Spazierfahrt in die Zukunft oder Liebst Hölderlin, magst’ weiterziehen? Hannover: Hartmuth Schöder 1993. n.p.
Seeberg, Mikkel. Italien – Udvalgte byer. Italy – Selected cities. Denmark: Forlaget 191, 2005. 60 pages
Smith, Lauren. The Visionary Pinhole. Salt Lake City: Gibbs M. Smith, Inc., Peregrine Smith Books, 1985
White, Garrett. “Yasu Suzuka. The Horizon of Time”. Camera and Darkroom, June 1992, pp. 34–39
Wolff, Ilan. Camera obscura. San Sebastian: Kutxa fundazio / Fundación Kutxa 2008. 144 pages. ISBN 978-84-7173-516-4. Text in Basque, Spanish, French and English.
Zwichenzeit. Camera obscura im Dialog. 20 Fotograf/innen und 7 Textautor/innen äussern sich zum Thema Lochkamera. Siegen 1993. 125 pages
Some Pinhole Photography Links
Blogs, Forums, General Pinhole Sites and Galleries
- New Mexico Digital Collections: Pinhole Resource Collection
- Worldwide Pinhole Photography
Day - The World’s Largest Pinhole Photograph
- Facebook: Pinhole Photography
- Facebook: Pinhole Photography Light and Form
- Facebook: Pinhole
- Facebook: ピンホール写真 (Pinhole Photography)
- Facebook: Fotografía Estenopeica y Alternativa
- flickr: The Pinhole Pool
- Alternative Photography
- Robert Colognoli:
La photographie au sténopé (French) - Dialogue de l’image (French)
- Pinhole.ru (Russian)
- Pinhole.ru (Google translation into English)
- Fotografia otworkowa (Polish)
- Tarja Trygg: Solargraphy
Individual Photographers
- Zdenek Bakštein
- Luca Baldassari
- David Balihar
- Dianne Bos
- Nancy A. Breslin
- Dieter Bublitz (German)
- Diego López Calvín
- Martha Casanave
- Katie Cooke
- Walter Crump
- Nick Dvoracek
- Andriy Dzugaev (Russian)
- Gerald Figal
- Riccardo Gazzarri (Italian)
- Alex Gilham (anamorph pinhole video)
- Paolo Gioli (Italian)
- Gina Glover
- Carll Goodpasture
- Steve Gosling
- Jon Grepstad
- Toshihiro Hayashi
- Volkmar Herre (German)
- Trond Kjetil Holst
- Steve Irvine
- Jesús Joglar
- Peggy Ann Jones
- Carlos Jurado (Spanish)
- Danny Kalkhoven
- Lena Källberg (Swedish)
- Jan Kapoor
- Gregg D. Kemp
- Jeff Korte
- Herman Krieger
- Juergen Lechner
- Colin Lowe
- Jeff McConnell
- Dirceu Maués (Portuguese)
- Erick Mengual (French)
- Paul Mitchell
- Chris Peregoy
- Chris Pinchbeck
- Marja Pirilä
- Antonio Prianon (French)
- Justin Quinell
- Eric Renner
- Mikkel Seeberg (Danish)
- Gregor Servais
- George Sheils
- George L. Smyth
- Massimo Stefanutti
- Mieko Tadokoro
- Peter Wiklund
- Ilan Wolff
- Willie Anne Wright
First published 1996. Last updated 10 March 2025.
© 1996 Jon Grepstad
jon.grepstad (at) getmail.no

.jpg)